|
Main Menu
|
|
|
|
My 2007 4Runner
|
|
|
|
|
|
|
|
|
|
|
|
|
*New*
|
|
|
|
|
|
|
|
|
|
|
|
|
|
|
|
|
|
|
|
*New*
|
|
*New*
|
|
|
|
|
|
|
|
|
|
|
|
|
|
|
|
|
|
|
|
|
|
|
|
|
|
|
|
|
|
*New*
|
|
|
|
|
|
|
|
|
|
|
|
|
|
|
|
|
|
|
|
|
|
|
|
|
|
|
|
|
|
|
|
|
|
|
*New*
|
|
*New*
|
|
*New*
|
|
|
|
|
|
|
|
*New*
|
|
*New*
|
|
*New*
|
|
*New*
|
|
|
4Runner History
|
|
|
|
Other
|
|
|
|
|
Concept:
Toyota has rated the 4th Generation (2003-2009) 4Runner for a 1,500 Lb. maximum payload capacity (including occupants, equipment and cargo).
Recently I have been using the 4Runner to haul loads of this maximum amount 1,500 lb.
When doing so there is significant sag in the rear end. I measured the sag amount at 4-1/2" with a full 1,500lb. cargo load.
Carrying heavy loads like this results in loss in ride quality such as
bottoming out, poor headlight aim, increased body roll, poor braking and steering, rougher ride, etc.
In an attempt to limit the amount of rear end sag when loaded I have installed Air Lift air bags.
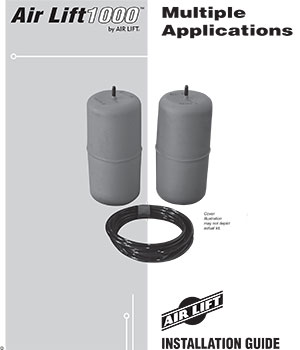
Air Lift’s 60000 series Air Lift 1000 air springs are marketed to help support rear coil springs and provide up to 1,000 lbs. of load-leveling capacity.
Air Springs are one solution to counter rear end sag due to carrying heavy loads.
Alternative methods to limit sag include changing the rear coil springs to ones with a greater spring rate.
But that would mean having a higher spring rate at all times, even when not carrying a load.
One of the benefits of using the Air Springs is that when not carrying a load you can run the bags with minimum pressure in them, which is 5psi.
At that low pressure level, there is no harsh ride as there would be with coil springs of a much higher rate.
The Toyota 4Runner 4th Generation (2003-2009) rear coil springs are rated at 180lb/in.
Toyota FJ Cruiser rear coils, a popular swap done by many 4th Gen owners including myself, are rated at 190lb/in.
This means that the rear coil spring will compress 1" for each 180/190 pounds loaded into the cargo area of the vehicle.
This equates to 360/380 pounds per pair of springs per one inch compression.
So with a 1,500lb load, the 4-1/2" sag I noted is to be expected. (1500/(190*2))=4".
Choosing an appropriate Air Bag size:
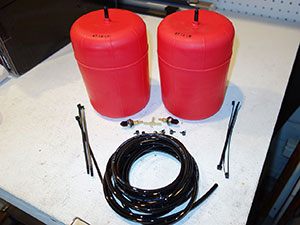
I started out with the Air Lift 60809 kit as recommended for the 4Runner.
I was experiencing a little more sag with the air springs than expected.
Although the Air Lift kit is designed with a 1,000 lb load in mind, I understand I am exceding this by 50%.
Since I am running FJ Cruiser rear springs which are approximately 3/4" longer than factory 4th Gen 4Runner springs, I ultimately switched the #60809 air bags out for the 1" longer set #60744.
The improvement noted was minimal but worth the try.
You can find sag measurement tables for both sets of air springs at varying cargo loads towards the end of this write-up.
AirLift Air Bag
Kit Part No. |
AirLift Air Bag
Individual Bag Part No. |
Bag Diameter |
Bag Height |
Recommended Usage |
| #60809 |
#60309 |
5.38" |
6.50" |
OEM 4Runner Springs |
| #60744 |
#60244 |
5.38" |
7.50" |
1" longer springs
OEM FJ Cruiser Springs |
| #60733 |
#60233 |
5.38" |
8.50" |
2" longer springs |
| #60808 |
#60308 |
5.38" |
9.50" |
3" longer springs |
Pics of the #60809 bags are after using for one month so they are a little distorted from being under pressure in the coil spring.

Air Lift
Kit #60809 |
Air Lift
Kit #60744 |
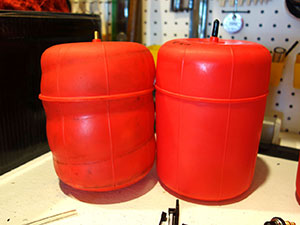
Air Lift Comparison
#60809 Left
#60744 Right |
Air Lift Comparison
#60809 Left
#60744 Right |
Choosing an Installation Methodology:
Air Spring Installation Methodologies |
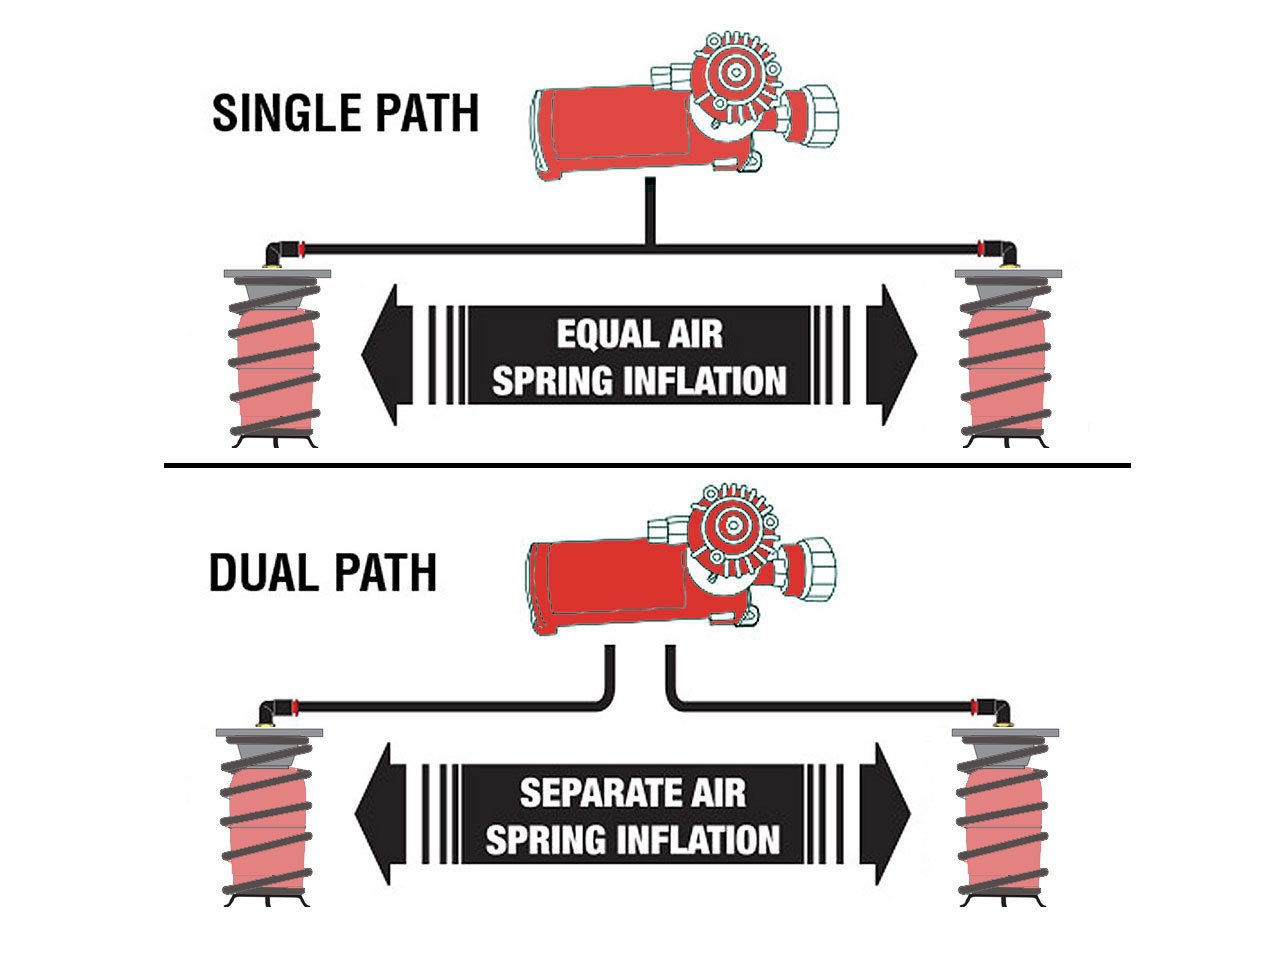
There are two basic options for installation. Single Path or Dual Path.
Single Path means “single channel” or “single pressure”.
The air bags are Linked together.
This means both of your air springs will be set to a single pressure and the pressure in each air spring will be equal.
Single path means you will install a single inflation valve in which to inflate/deflate both air springs at one time.
Single Path Pros:
Quicker inflation and deflation of both sides of the vehicle simultaneously
The air springs will always be set to the same pressure
Perfect for loads that are evenly distributed from left to right
Great option for off-roading whereas when one wheel compresses the air in the compressed side air spring transfers over to the other side pushing that other side downward for greater traction
Single Path Cons:
Loads that are not evenly distributed side to side will not be supported well because the unbalanced load will transfer air to the spring with less weight on it
Poorer cornering performance when the outside wheel compresses the air in the compressed side air spring transfers over to the other side extending that side which is already lifting up giving an effect opposite to that of the sway bar
Dual Path means “dual channel” or “dual pressure”.
The air bags are Independent of each other.
This means you have the ability to set two separate pressures.
Dual path means you will install two inflation valves in which to inflate/deflate each air spring separately.
Dual Path Pros:
Choose dual path for inflating each side separately
This allows for your air springs to be set to different pressures depending on your needs
This is useful if you will be carrying uneven loads where you may need to set one air spring to a higher pressure than the other
No air transfer side to side makes for better cornering performance and less sway and body roll
Dual Path Cons:
Not good for off-roading as even with the minimum 5psi pressure, the bag cannot fully compress by transferring air to the opposide side
This introduces more body roll when one wheel is going over an obstacle and not be able to fully compress its spring
Longer time to inflate as you need to air up two inflation valves
Harder to get and maintain identical pressures on both sides due to seperate valves and possible differing rates of air loss
A catastrophic failure of one side would require you to stop the vehicle and manually let air out of the other side to avoid unstability or greatly differing pressures
I have done both type of installations, single path and dual path.
I started out with the single path method. I figured this was the best compromise. I would simply always spread the load out evenly and not have to
worry about the loss of flex off-road if the air bags were set-up in a dual path, independent fashion.
But I quickly noticed that I often had a load only on one side due to a rear passenger utilizing the 40% split seating side and the cargo sitting on the 60% side.
Also the opposite sway bar effect of linked bags was a show stopper.
Again, this effect is noted when cornering and the air in the outside compressing spring transfers to the other side...countering the anti sway bar which is trying to keep the vehicle flat.
So I quickly changed over to a dual path method, ordering Air Lift's #22007 Replacement Air Line Kit which includes 15' of replacement air line tubing.
While this would be the best on-road option, I was still worried about the loss of flex off-road when it would be needed most.
Combined Installation Methodology utilizing BOTH Single Path and Dual Path schemes:
That is when I came up with the idea of using an Air Switch to take advantage of both installation methodologies.
The air switch acts as an air valve which can either link the two air springs together when open, or can make the two sides operate independently when closed.
This provides the best of both worlds. I can put the switch in the open position, then quickly air up both springs to equal pressure.
Flip the swith to closed position and adjust one sides pressure as needed. After hauling cargo, flip back to open position, let the air down to 5psi using only one schrader valve and
leave the air swith in this open position to allow for full spring compression only available when side are linked to allow for air transfer from side to side.
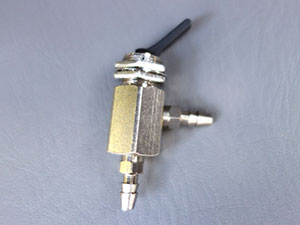
Pneumadyne C030201
2-way Toggle Valve with 1/8" male barbs |

Pneumadyne Spec Sheet |
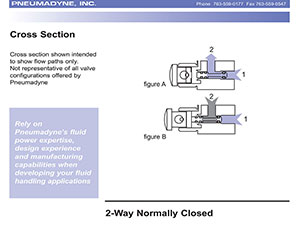
Pneumadyne Cross Section |

Pneumadyne C030201
2-way Toggle Valve with 1/8" male barbs |

Combined Air Spring Installation Methodology
utilizing BOTH Single Path and Dual Path schemes |
Installation:
The rear air bag installation is straight forward and will take about one hour per side.
Additionally leave about one hour to run all the air hoses, install the inflation valves and air switch and make thing nice and neat.
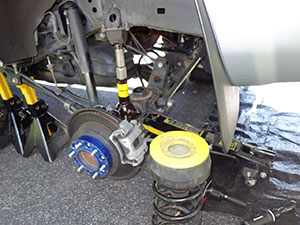
Start out be removing the nut on the top of the rear sway bar end link.
Then lift one side of the vehicle using a hydraulic jack.
Support the rear frame with safety stands placed just in front of the rear wheel.
Remove the rear wheel on the side you are working on.
Remove the bolt on the parking brake bracket to give it enough slack.

Rear Sway Bar Nut |
Factory Service Manual (FSM)
Rear Sway Bar |

Rear driver side during installation |
Reposition the jack under the rear axle and lift a little to take weight off the shock.
Then the lower shock bolt can be removed and the shock can be pryed off its mount using a pry bar.
Now you can slowly lower the jack releasing tension on the coil spring.
Since I have a Daystar Lift Spacer and 10mm OME trim packer installed the spring will not simply fall out as it may otherwise.
In order to remove the spring I placed the factory bottle jack inbetween the bumpstop and the axle to spead the two further apart.
You can now be remove the coil spring along with the coil spring isolator bump stop.
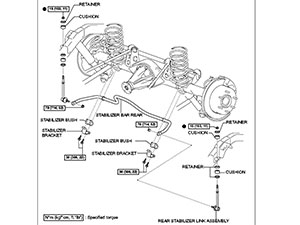
The panhard rod (rear lateral control rod) was not needed to be removed.
Also the XREAS lines don't come into play as you do not unbolt the top of the shock.

Factory Service Manual (FSM)
Rear Suspension |

Rear Shock Bolt |
Rear driver side during installation |
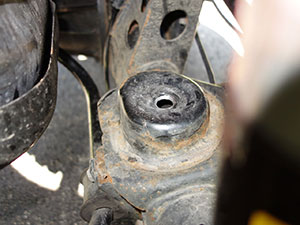
Remove the large jounce bumper in the top of the coil spring.
Trim the jounce bumper as specified by removing the lower four segments.

Factory inside the coil bumpstops |

Cut down Jounce Bumper |

Cut down bumpstop |
The installation manual specifies to drill the small hole in the lower spring seat out using a 9/16" drill bit or grind with a die grinder for hose access to cylinder.
After doing so, using my right angle close quarters drill, I found the 9/16" size to be too small for my liking and went back and made it about 3/4".
Be sure to use a dremel tool to clean up any sharp edges left from drilling to avoid cutting the air hose that will go thru here.
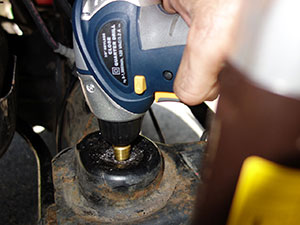
Drilling out spring perch |
Enlarged hole in spring perch |
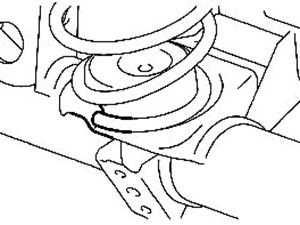
Rear Coil Spring Orientation |
At this point you have determined what installation methodology you will be using...Single Path, Dual Path or my Combined Method.
Cut an adequate length of air line for the side of the vehicle you are working on, leaving sufficient air line slack to preven any strain on the air fitting during axle motion especially when off-road.
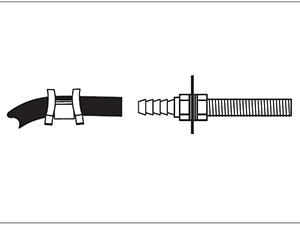
Slide the air line clamp onto the air line before pushing the air line onto the fitting.
Push the air line over the brass air fitting on the air bag until all the barbs are covered.
With pliers, slide the air line clamp forward until it fully covers the barbed section.
It is difficult to push the air line onto the barbed fitting but it can be done dry.
Alternative methods to get the line on easier include holding the first inch of the air line in very hot water for a minute. For me this was inconvenient and did not work well.
I found that heating the first inch of air line with a lighter for a quick five seconds made for a much easier install.
Once the air line is on the air bag, insert the cylinders into the springs with the inflation stem pointing downward.
Route the air line thru the hole you enlarged earlier.
Install the springs back onto the vehicle’s rear suspension with the shortened jounce bumper in the top.
For the 4th Gen 4Runner installation you do not need to use the round air spring protector on the stem side (bottom) of the cylinder.
Ath this point you can completely re-install the suspension by putting back the shock absorber, the parking brake bracket, and the wheel.
Let the vehicle back down and put back on the sway bar end link.
Then do these same steps to the opposite side getting to the point where you have both air springs installed
and the air line routed thru the lower spring perch ready to route to the back of the vehicle.

Air Lift #60809
Driver Side
un-inflated during istallation |

Air hose
connection to air bag |
Now we need to route the two airlines to the passenger side rear bumper area.
To prevent the air line from melting, keep it at least eight inches from the exhaust system.
Locate desired tee location on the frame rail or cross member.
Again, to install a tee, slide air line clamp onto the air line. Push the air line onto the tee fitting, covering all the barbs.
With pliers slide the air line clamp until it fully covers the barbed section.

Air hose
connection to tee fitting |
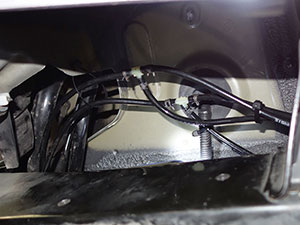
Air Line
Tee Fittings |
Route the remaining air line along frame to desired inflation valve location. Attach the air line along the way with plastic cable straps.
Select a location for inflation valve in the gas cap well, the trunk, rear bumper, fender flange or behind the license plate.
Insure that the valve will be protected and accessible with an air compressor hose for pressurizing.
Drill a 5/16” hole for the inflation valve(s) and mount as in the illustration below. Rubber washer is for outside weather seal.
Again, slide air line clamp over the air line. Push air line onto fitting covering all barbs, with pliers slide the air line clamp forward until it fully covers the barbed section.
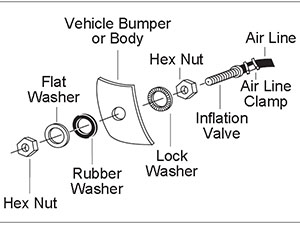
Schrader valve
installation |
Air hose
connection to schrader valve |

Air Line
Connections to Air Switch
and inflation valves |
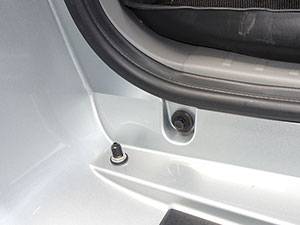
Bumper Mounted
Schrader Valve |

Bumper Mounted
Air Switch
and inflation valves |

Bumper Mounted
Air Switch
and inflation valves |
Inflate Air Springs to 35 psi. Check for air leaks at all fittings and valve core with a soapy water solution.
Deflate Air Springs in 5 psi intervals to determine best ride and handing.
Recheck air pressure after 24 hours. A 2-4 psi loss is normal after initial installation.
If the pressure has dropped more than 5 psi re-test for leaks with a soapy water solution.
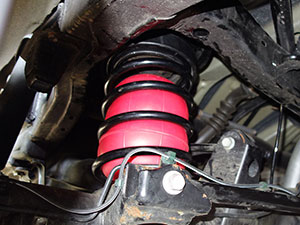
Here are some pics of the Air Lift Air Springs Kit #60744.

Air Lift #60744
Driver Side
Inflated |

Air Lift #60744
Passenger Side
Inflated |
Air Lift #60744
Passenger Side
Inflated |
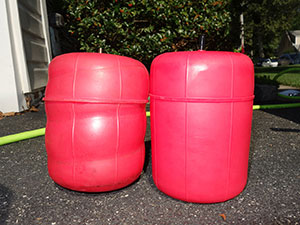
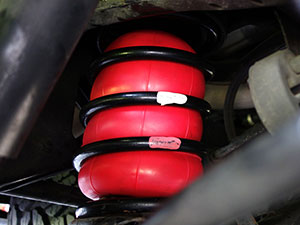
Here are some pics of the Air Lift Air Springs Kit #60809.
Air Lift #60809
Driver Side
Inflated |

Air Lift #60809
Driver Side
Inflated |

Air Lift #60809
Passenger Side
Inflated |

Air Lift #60809
Passenger Side
Inflated |
Measurements table for Airlift Kit 60809/60309:
Air bags measure 5.38" wide x 6.5" tall
Installed on 2007 4Runner with 3" rear lift (Daystar spacer part# KT09115BK and Toyota FJ Cruiser rear coil springs)
Setup = Air bags linked together, using teed air line.
Air Bag
Pressure |
Cargo
Load |
Driver
Side |
Passenger
Side |
Sag from
Incremental Load |
Sag from
Baseline |
| 5 psi. |
0 lbs. |
37-7/8" |
38-5/8" |
Baseline |
Baseline |
| 35 psi. |
0 lbs. |
38-1/4" |
39" |
+3/8" |
+3/8" |
| 35 psi. |
250 lbs. |
37-3/4" |
38-1/2" |
(1/2") |
(1/8") |
| 35 psi. |
500 lbs. |
37-1/4" |
38" |
(1/2") |
(5/8") |
| 35 psi. |
750 lbs. |
36-3/4" |
37-1/2" |
(1/2") |
(1-1/8") |
| 35 psi. |
1000 lbs. |
36-1/4" |
37" |
(1/2") |
(1-5/8") |
| 35 psi. |
1250 lbs. |
36" |
36-3/4" |
(1/4") |
(1-7/8") |
| 35 psi. |
1500 lbs. |
35-3/4" |
36-1/2" |
(1/4") |
(2-1/4") |
Measurements table for Airlift Kit 60744/60244:
Air bags measure 5.38" wide x 7.5" tall
Installed on 2007 4Runner with 3" rear lift (Daystar spacer part# KT09115BK and Toyota FJ Cruiser rear coil springs)
Setup = Air bags NOT linked together, using dual air lines.
Air Bag
Pressure |
Cargo
Load |
Driver
Side |
Passenger
Side |
Sag from
Incremental Load |
Sag from
Baseline |
| 5 psi. |
0 lbs. |
38-1/8" |
38-5/8" |
Baseline |
Baseline |
| 35 psi. |
0 lbs. |
38-5/8" |
39-1/8" |
+1/2" |
+1/2" |
| 35 psi. |
250 lbs. |
38-1/8" |
38-5/8" |
(1/2") |
0" |
| 35 psi. |
500 lbs. |
37-1/2" |
38-1/8" |
(1/2") |
(1/2") |
| 35 psi. |
750 lbs. |
37" |
37-5/8" |
(1/2") |
(1") |
| 35 psi. |
1000 lbs. |
36-5/8" |
37-1/4" |
(3/8") |
(1-3/8") |
| 35 psi. |
1250 lbs. |
36-1/4" |
36-7/8" |
(3/8") |
(1-3/4") |
| 35 psi. |
1500 lbs. |
35-7/8" |
36-1/2" |
(3/8") |
(2-1/8") |

Without Air Springs
1,000 lb. cargo load |

With Air Springs
1,500 lb. cargo load |
Many times when carrying a full cargo load my rear view mirror tends to be blocked.
This is when my
Blind Spot Monitor and Anytime Backup Camera Mods come in handy.
Check them out!
|
|