|
Main Menu
|
|
|
|
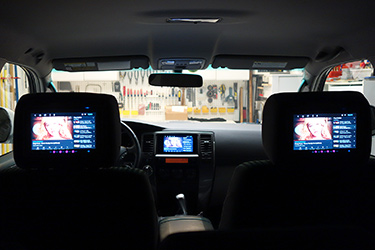
My 2007 4Runner
|
|
|
|
4Runner History
|
|
|
|
Other
|
|
|
|
|
Concept:
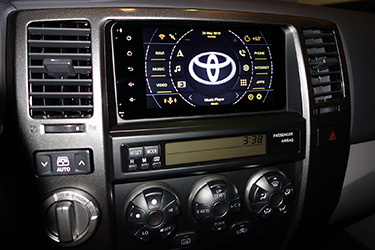
One of the reasons I special ordered my 2007 4Runner was to include
a must have option, the Toyota DVD based Navigation System. A special order was the only way, in my region, to get this high end option on the Sport Edition model
while at the same time excluding the Moonroof.
This was a $2,137 invoice ($2,620 retail) option which included a JBL® AM/FM 4-disc CD changer
with voice-activated DVD navigation system, satellite radio capability, hands-free phone capability via Bluetooth® wireless technology, backup camera,
eight speakers and MP3/WMA playback capability.
It required options FE (50 State Emission Equipment, no charge) and NJ (Homelink Garage Door Opener, $100/$125).
I am very happy I purchased that option as the benefits far outweighted its shortcomings.
The benefits were the factory fit/finish and integration into the dashboard, bluetooth handsfree phone capability, backup camera, AUX in capability, upgraded JBL audio system,
and of course the navigation system itself.
The shortcomings included being a DVD based navigation map system in which the expensive updates from Toyota were only available
once per year (and after the 10 year mark took even longer to be released). When the map updates actually are released they were already up to one year out of date
due to the needed development and lead production time required. Additional shortcomings were the motion lockout
(though this was remediated via my Nav Override Mod)
and the voice recognition system that really never recognized anyones voice.
The factory system was still working perfectly even at my vehicles 12 year mark, but it was feeling very dated as compared to the more modern technology currently available.
After driving a new Toyota vehicle with Factory Apple CarPlay installed, I knew that if I was really going to keep this vehicle another 8+ years
(in order to hit my goal of 20+ years of ownership), I would need to upgrade my 4Runner's Navigation system.
That brought on further research and the ultimate question...should I get a mainstream Pioneer, Kenwood, or Alpine head unit which would have have Apple Carplay
and integrated navigation (as a backup for those times with no cellular service and/or out of plan data), or go with a much cheaper off brand head unit
as my vehicle is already past its halflife and I spent a fortune already on a factory system.
The answer became apparent quickly. While the mainstream units were nice, were well tested and had mass adoption, they came with a very steep price.
They also required various add ons to retain the many factory features such as JBL amplifiers, rear view backup camera, steering wheel controls, dual factory antennas,
trim faceplates for proper fit, etc. Also, their 800 x 480 pixel touch screens seemed a little low spec. It just seemed like a lot to pay simply to utilize my
own smartphone's navigation system, bluetooth phone and stored music thru Apple CarPlay. Sure their sound system would be high end, but I am no audiophile who is looking
for the absolute highest fidelity sound reproduction, and am rather interested in more modern technology, features and flexibility.
My research showed there is a whole lot more technology available if you are willing to go off brand. An Android based head unit will allow for both
Apple CarPlay and Android Auto via a USB connected dongle. You get the full functionality of an Android tablet, right in your dashboard. Basically
it is like having a mini computer in your vehicle, a full in car entertainment system.
Virtually any app you can find in the Google Play Store, you can download and run on these head units. You can have your choice of;
- Navigation (Google, Waze, Sygic, Apple Maps [with Apple CarPlay Module], etc.),
- Music (Amazon Music, iHeartRadio, Pandora, Spotify, Apple Music [with Apple CarPlay Module], etc.),
- Video (Youtube, Amazon Prime Video, Netflix, etc.),
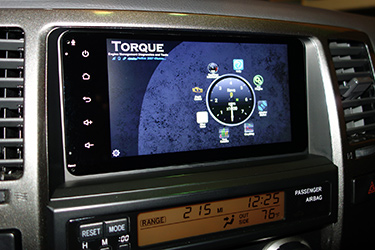
- OBD2 (Torque Pro, etc.),
- Internet (full browser access, Google Search, Google Assistant, etc.).
The list is virtually endless.
I even can access my Google Drive as well as my home media server where I store all my Music, Movies and Photos.
Of course though these entertainment features should not be used by the driver while driving, they really do come in handy when spending time in the vehicle for a multitute of reasons.
Additionally, anything on the Android screen can be displayed on my rear passengers screens at any time.
Choice of Android Head Unit:
Surprisingly there are not many Android Head Units available that are specifically made for the 4th Generation (2003-2009) Toyota 4Runner.
For me a perfect factory fit and finish would be required. I also wanted one with up to date specs, and to be as plug and play as possible. While there are a few
generic double din Android based head units available on the market, they would require trim pieces on the sides to cover the gaps as the Toyota Factory Navigation system
has buttons along both sides making the available space larger then a true double din system.
So I reached out to a few manufacturers and was able to get one to work with me. I had the wiring diagrams handy and the knowledge of what needed to get accomplished.
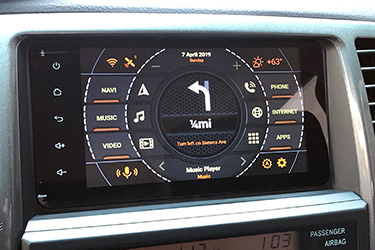
CarTrimHome.com had their engineers take a look and came up with a unit that fits the dashboard perfectly
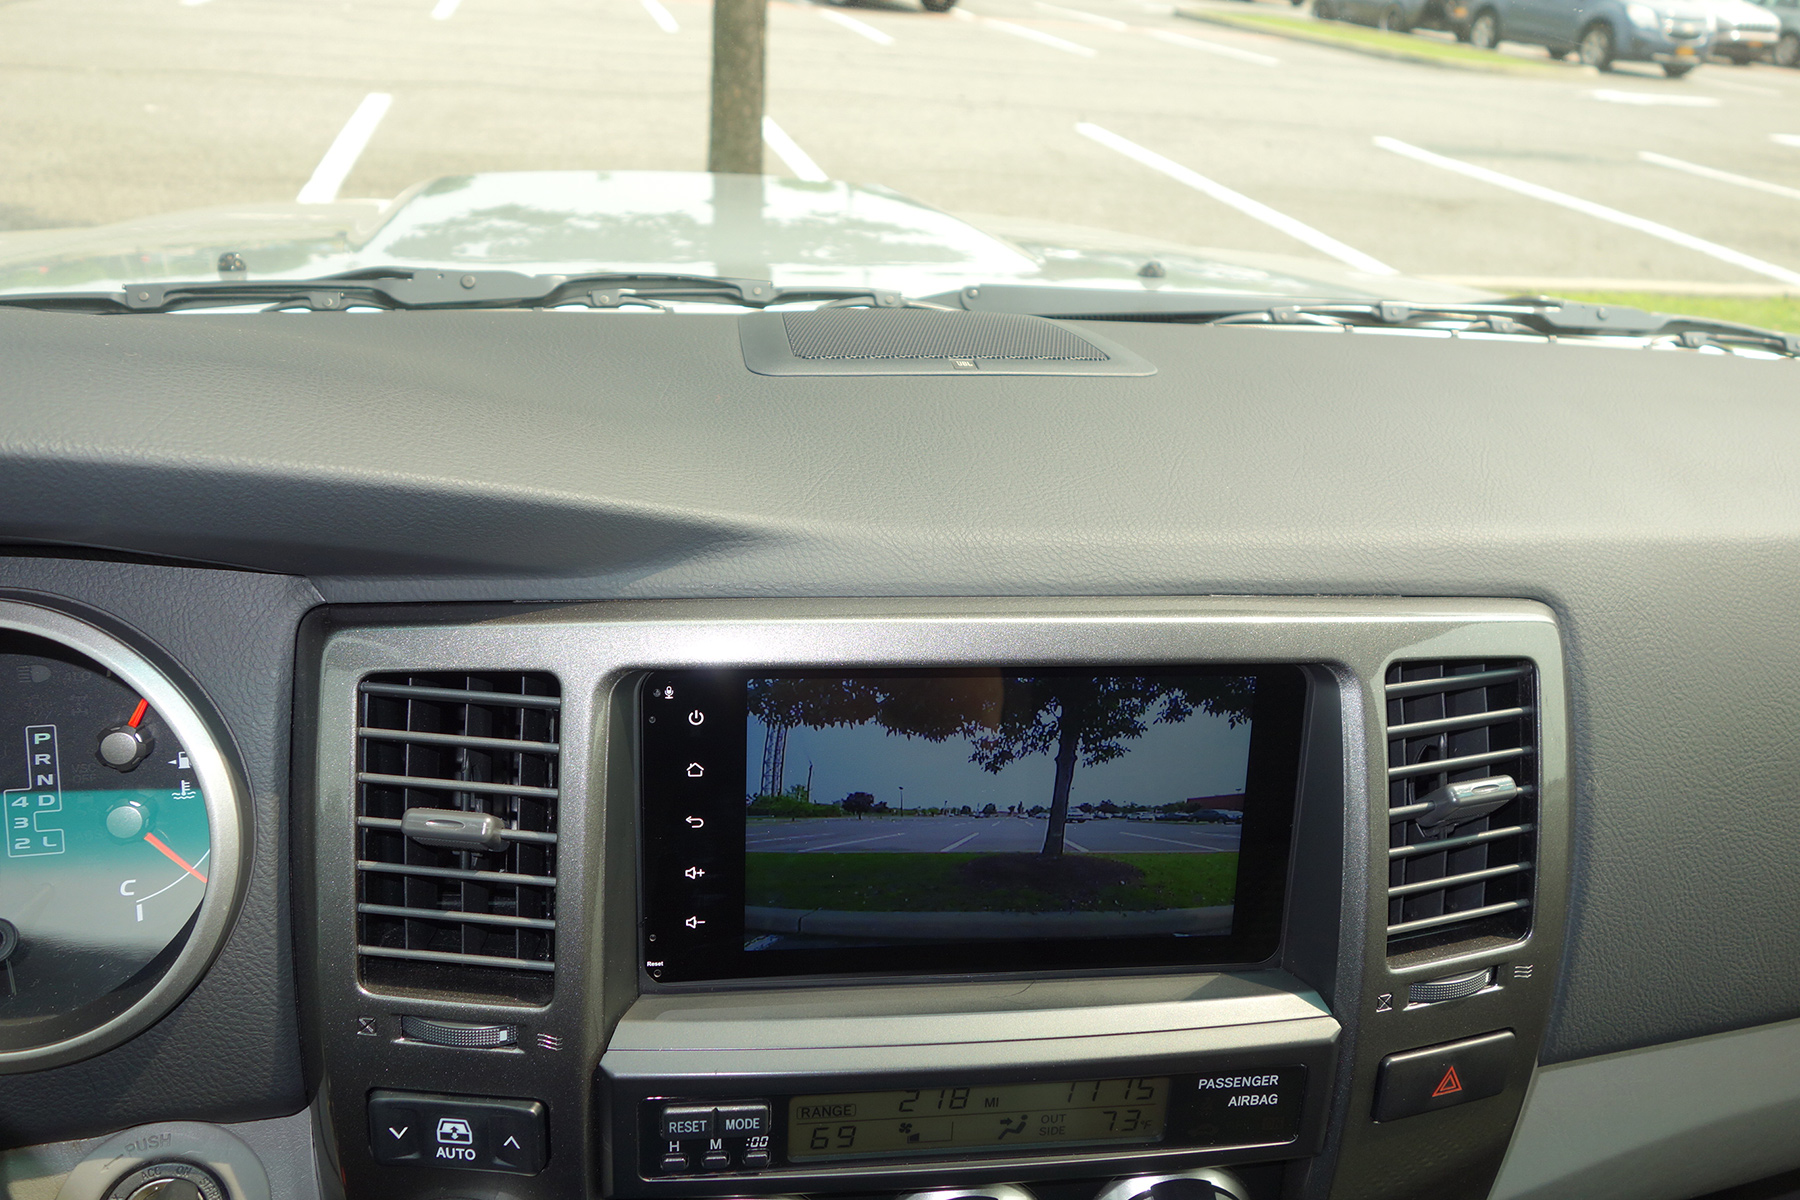
and does not need a trim bezel at all. While the actual display screen is only slightly larger than the factory unit at 7" diagonal measurement,
it has a much higher resolution (1024 x 600 pixels!) and the touch screen glass covers all available space needing no surround trim which gives a nice new modern flush look.
After a few revisions to the wiring setup, and alot of testing, I was able to get the wiring harness working correctly.
I have communicated all necessary changes back to the manufacturer but unfortunately they have not yet released a wiring harness with these
needed revisions for direct plug and play compatability with the 4th Gen 4Runner for those replacing the factory navigation system.
So please be advised that you may need to (as of late 2019) manually splice wires rather than have a simple plug and play solution.
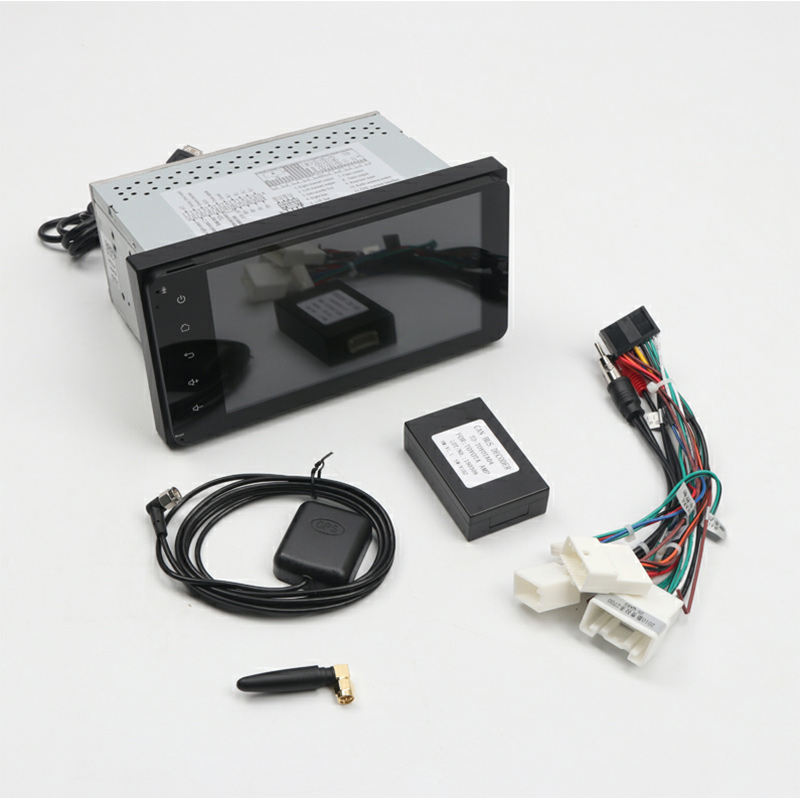
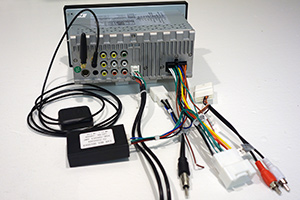
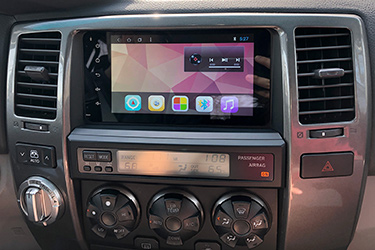
CarTrimHome.com Android Head Unit for the 4th Gen Toyota 4Runner (2003-2009):
Main Features and Specifications:
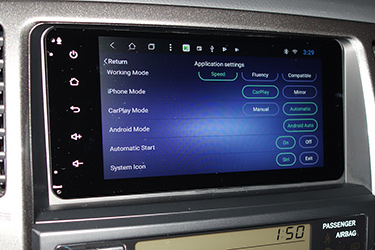
OS: Android 8.1.0 (Oreo)
CPU: Allwinner T8, Octa-Core (8 cores)
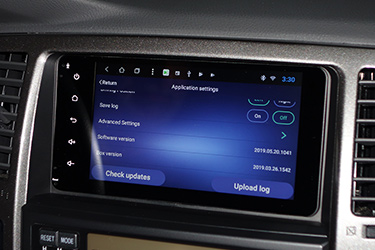
MCU Version: T8.3.21-63-30-C06101-180925
System Version: V9.3.1_20190107.115118_TW2-FD
Memory: 2GB DDR3 RAM, 32GB ROM
2xUSB
Display: 7" HD TFT, 1024x600 capacitive touch screen
Radio Tuner: FM/AM, RDS support
Output Power: 4 x 45W Amplifier power output
Built-in WiFi Dongle
Bluetooth / phonebook / handfree
Steering Wheel Control
CANBUS
Supports DVR
Supports OBD2
Supports Mirror link Screen Mirroring for Android or Apple Mobile phones
Supports Full HD 1080 Video Format
Supports External 3G dongle
Supports up to 500G Mobile hard disk drive
Multiple Input Sources
Everything can be Shared with RCA Output
Multi-Window View
Video Format: avi, mkv, mov, mp4, mpeg, mpg, rmvb , flv, H.265 ect.
Audio Format: MP3, WMA, AAC, RM, FLAC etc.
Photo: JPG, BMP, JEPG, GIF, PNG ect.
OS Language : English, Russian, Spanish, German, French, Italian, Magyar, Polish, Portuguese, Romania, Turkish, Arabic, Chinese, etc.
Efficient Heatsink
|
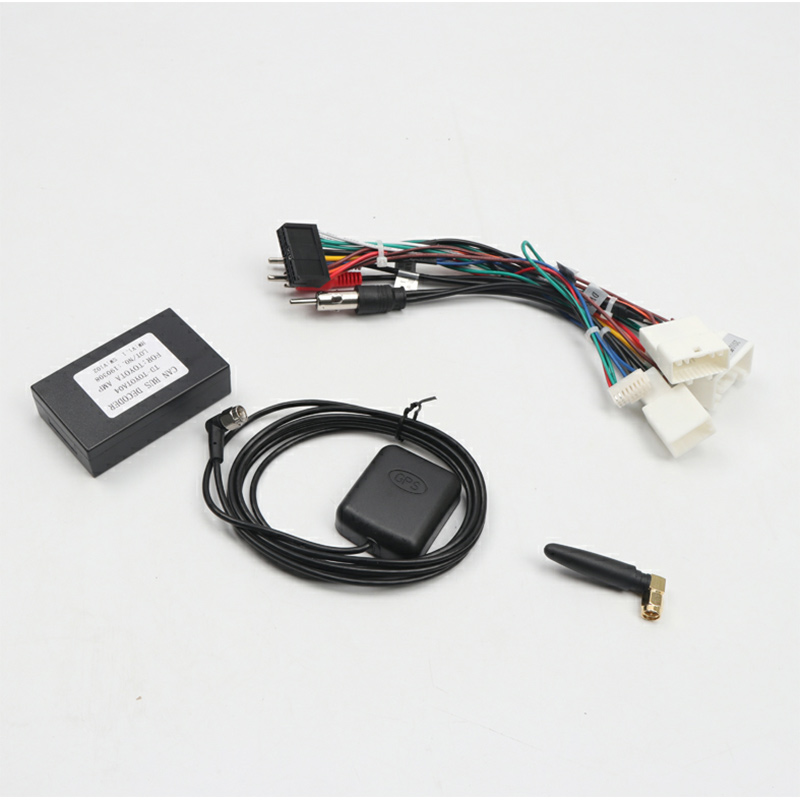
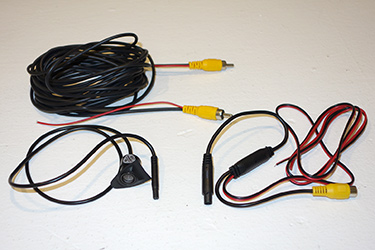
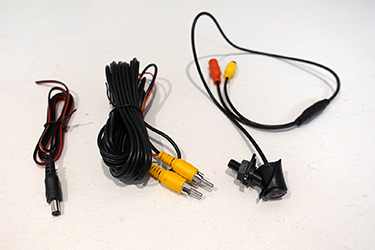
Included Items:
1 ISO wiring harness
2 USB Cables
1 GPS Antenna
1 Wifi Antenna
1 Toyota Canbus
1 set of installation tools
1 External Microphone
|
Optional Accessories:
Apple CarPlay Dongle
OBD2 Bluetooth Module
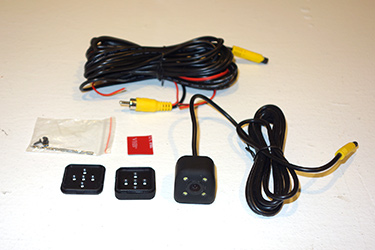
Backup Camera
Front Facing Toyota Logo Camera (eBay)
|
CarTrimHome Android Head Unit |
|
|
|
Unboxing:
CarTrimHome.com is based in Guangzhou China. Standard China Post shipping will take some time, upwards of two weeks closer to three.
Using the DHL shipping option will reduce the time to about a week, sometimes less. The product arrived with no damage, well packaged and included everything as expected.
Included is all necessary equipment to get up and running quickly. In addition to the the bezel-less double din 8-core head unit set up with Android Oreo 8.1.0,
standard packaging includes GPS Antenna, WiFi Antenna, Canbus module (to activate the factory JBL Amp), 2 built in USB cables, ISO wiring harness with Toyota connectors and trim removal tools.
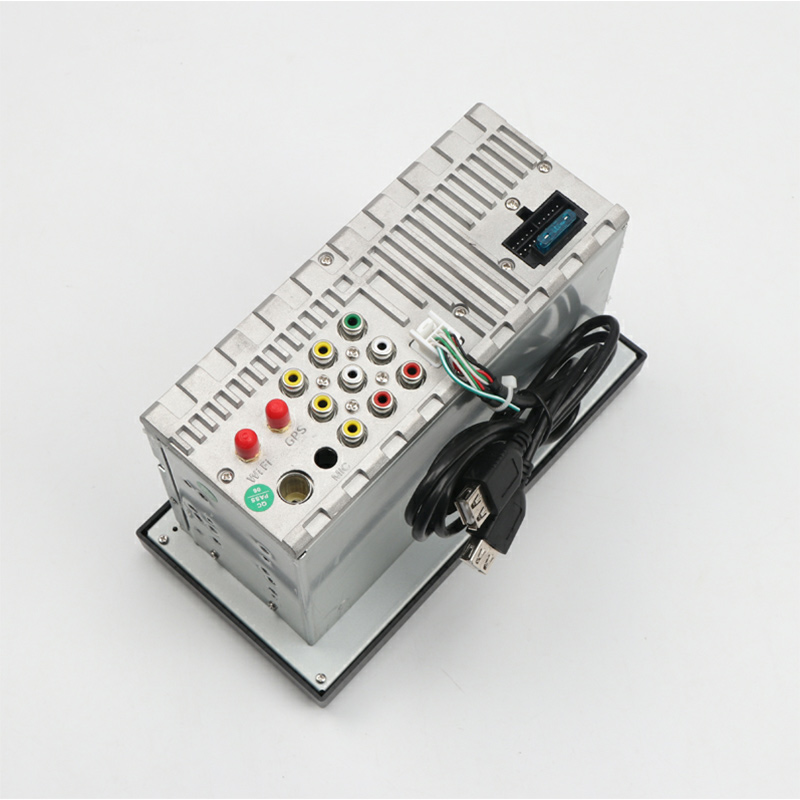
The head unit itself has an integrated heatsink on the rear side to keep it cool without any fan noise.
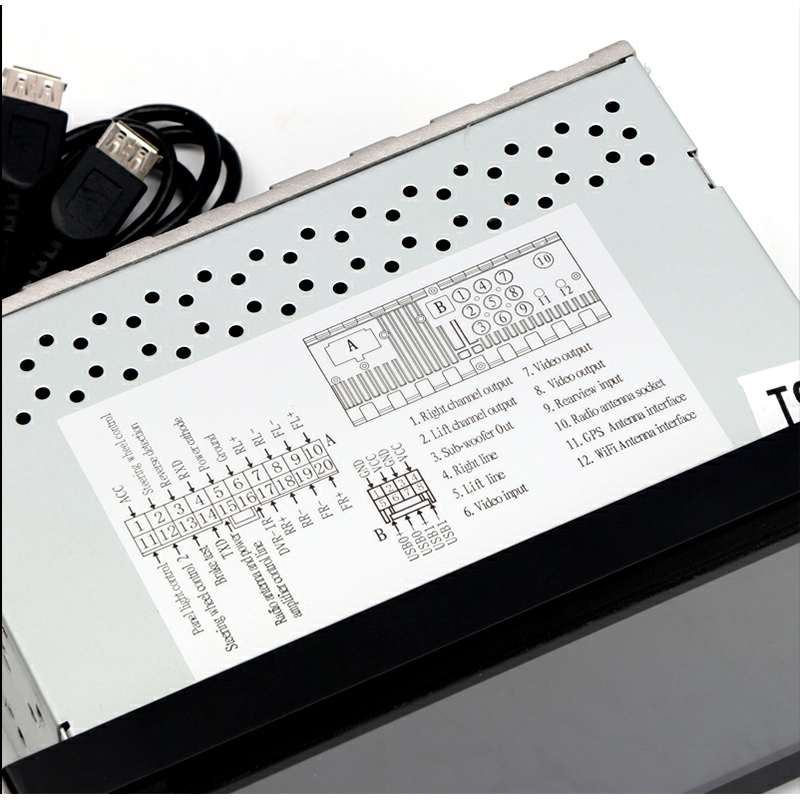
The schematic on the top details the inputs/outputs available.
There are two video inputs. Three or even four video inputs would have been ideal. One is dedicated for the rear facing reverse camera.
The remaining one I am using for a front facing camera. It would have been nice to have another two for input from my two DVD based rear seat screens,
though I am sure you can use a video RCA selector switch to accomplish same. My
Nav Video Mod
still works fine though so I can still see the rear screens up front as needed. My Anytime Rear Camera Mod and
Blind Spot Monitor Mods still work as well.
There are two video outputs and I am using one to send the Android video to my
rear passengers screens .
Rear seat passengers can simply change their source to "AUX input" and see what is being displayed up front.
There are two USB input cables connected to the head unit.
I am using one for the CarPlay dongle which adds Apple CarPlay and Android Auto support.
The second I have connected a USB Flash Drive for a massive amount of Music Storage.
There are inputs for the supplied GPS Antenna, the supplied WiFi Antenna and for the factory Radio Antenna.
Then there is an input for the 20-pin ISO Harness. This is the primary harness that connects the audio head unit device to the vehicle.
This is where the head unit will get its constant 12V power, accessory 12V power, ground, reverse signal, brake signal, steering wheel control signals, illumination power,
speaker output, etc.
Lastly, there is a 4th Gen specific Toyota 4Runner CANBUS (Controller Area Network) module included which facilitates activation of the factory JBL amplifier system.
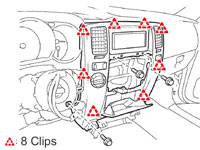
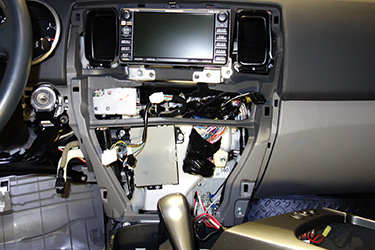
Removal of Toyota Factory Head Unit:
Follow these steps in order to remove the Toyota factory navigation unit.
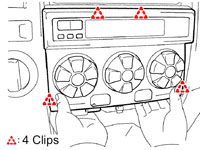
Remove driver side lower finish panel.
Start out by disassembling the lower dash area.
First remove the two 10mm bolts holding the lower finish panel on. Pull the panel straight out to disengage 4 plastic clips still holding it on.
The trim ring around the key hole will just pop out on it's own as you are doing this. Remove the wire harnesses attached to each of the switches
located on the back side of this panel. Also on the back right side of this lower finish panel is the room temperature sensor harness (cooler thermistor),
detach this from the panel as well. You may leave the fuel door release and the hood release handles attached to the panel. The panel can be lowered
to the floor now.
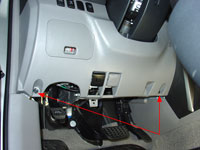
Remove driver side
lower finish panel |
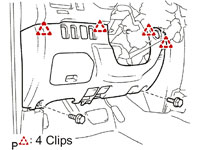
Pull to release 4 clips |
Center Console Removal.
To remove the center console, start by removing the shifter cover. It is held on with five clips and two claws. To remove you simply pull straight
up and back towards the rear of the vehicle. Before you can set the shift cover aside you need to remove any wire harnesses attached to it.
In my case I had to remove the DAC switch wiring and the 12v power point wiring. You may have more if you have the seat heaters,
rear air suspension or cigarette lighter options.
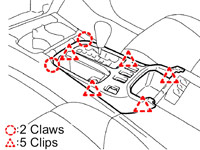
To remove shift cover
Pull to release 5 clips |
Next the console cover gets removed, this time there are 6 clips and two claws. To remove, again, pull straight up and back towards the rear of the
vehicle.
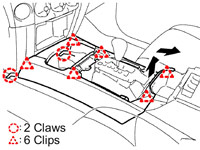
To remove console cover
Pull to release 6 clips |
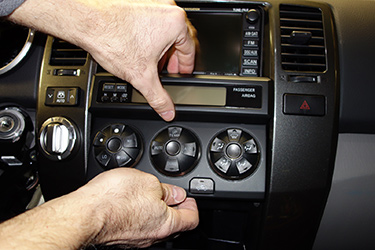
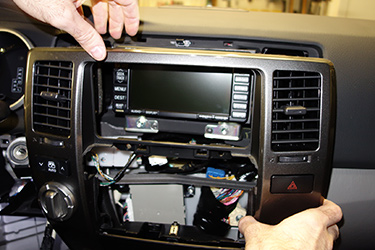
Center Instrument Cluster Removal.
To remove the center instrument cluster, start out by opening the storage bin under the climate control assembly.
Using a 10mm socket, remove the one bolt that is in there.
Remove bolt |
Using a 10mm socket |
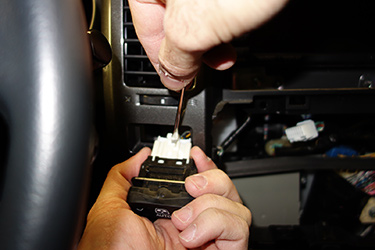
Disengage the 4 clips and remove the air conditioner assembly, and then disconnect the wiring connector on the back.
Pull to release 4 clips |
Pull to release 4 clips |
Pull forward and disconnect wire harness |
Climate control assembly removed |
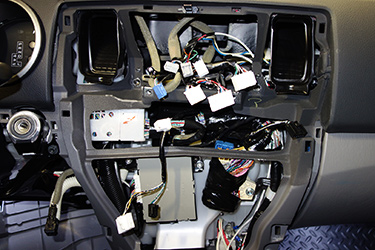
Now you can remove the center instrument cluster finish panel sub-assembly. First remove 3 bolts using a 10mm socket.
Then disengage the 8 clips. At this point you can disconnect the three wire connectors from the hazard lights, rear window control and 4WD selector.
Set the panel aside.
Remove 3 bolts
Pull to release 8 clips |
Remove 3 bolts
Pull to release 8 clips |
Remove connector
rear window control |
Remove connector
4WD selector |
Set panel aside |
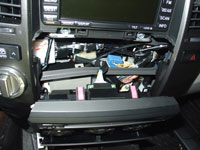
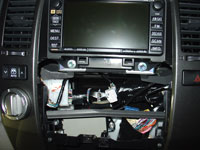
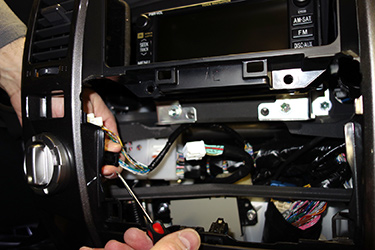
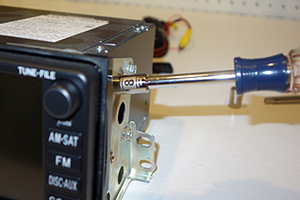
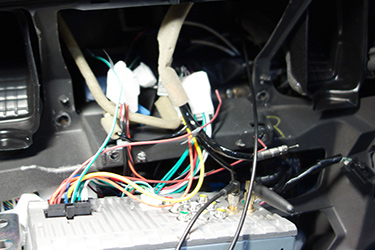
Using the 10mm socket, this time with an extension bar, remove 4 bolts holding in the navigation unit. Pull the navigation unit straight out.
Disconnect the 9 wire harnesses on the back side. Then set the factory navigation unit aside.
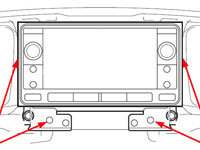
Remove 4 bolts
Pull navigation unit straight out |

remove 4 bolts
holding in the navigation unit |
remove 4 bolts
holding in the navigation unit |
Bracket bolts removed |
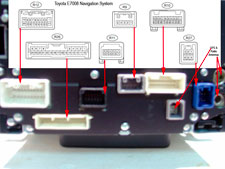
Disconnect Navigation wiring connectors |
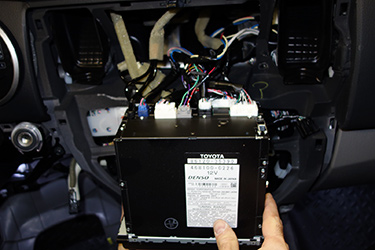
Pull navigation unit straight out |
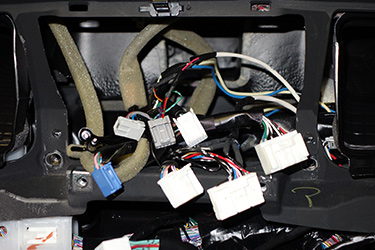
Disconnected wiring connectors |
Disconnected wiring connectors |
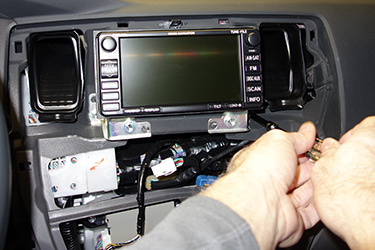
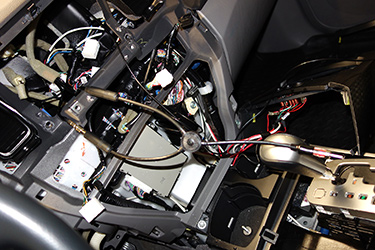
Installation of replacement head unit and associated accessories:
CarTrimHome.com Android Head Unit Installation
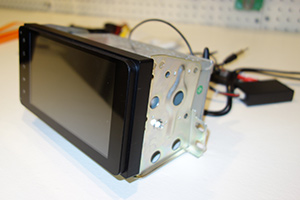
Once you remove the factory navigation system from the vehicle, transfer the factory side brackets over to the Android head unit. Each bracket is held on by four bolts.
But when installing them onto the Android head unit you will only be able to use one bolt per side. You will need to slot the factory mounting hole to allow
for more up/down adjustment of the head unit in the dash. Use a dremel tool to accomplish this. Even with only one bolt per side,
once installed the head unit will be mounted solidly enough that there is no movement during usage.
Remove side brackets from factory navigation
|

Install brackets onto Android head unit
|
Install brackets onto Android head unit
|
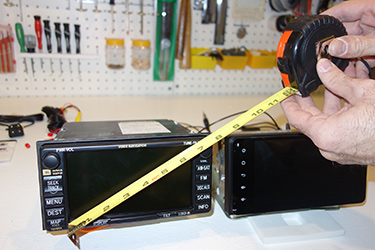
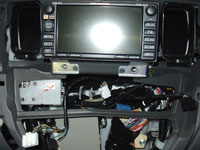
Factory Toyota Screen
|
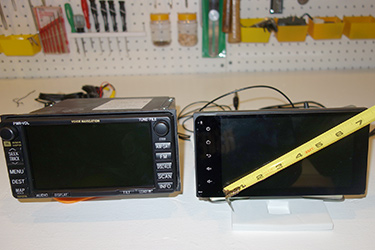
Slightly larger Android Screen
|
Connect to the head unit the supplied 20-pin ISO Harness, GPS Antenna, WiFi Antenna, CANBUS module and USB Harness.
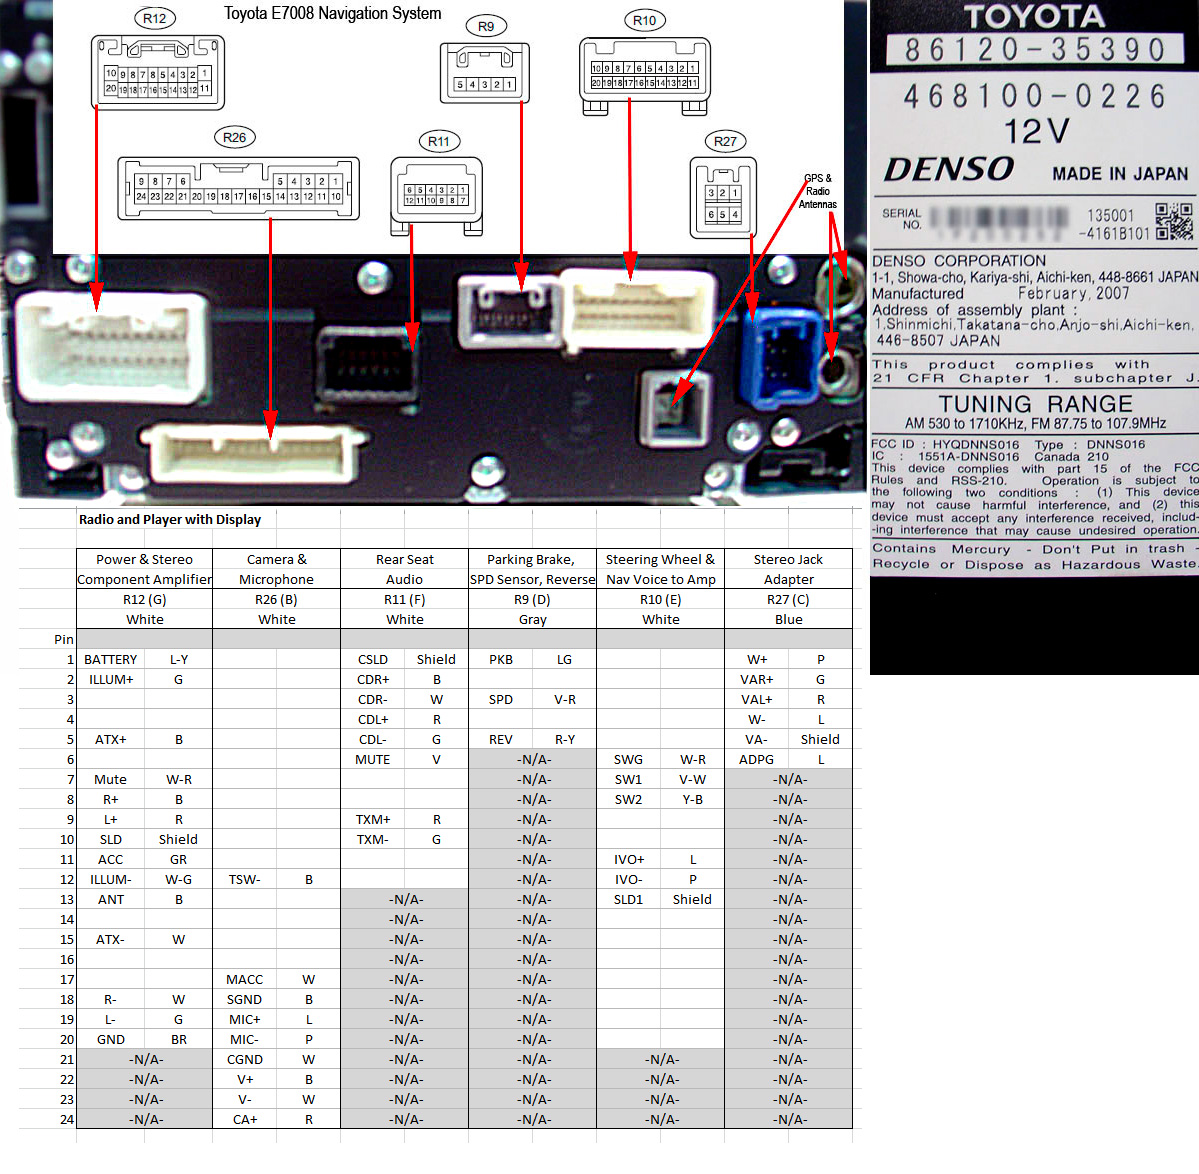
Then connect the ISO Harness to the vehicle connectors R12 (Power and Stereo), R26 (Camera), R10 (Steering Wheel) and R9 (Reverse).
Also Install the included GPS Antenna up into the underside of the dash using the supplied 3M double sided tape.
Vehicle connectors R11 (Rear Seat Audio), R27 (Stereo Jack / AUX Input) and the factory GPS Antenna will remain unused.
Make connections to the Android head unit
|
Make connections to the vehicle
|
Antenna Adapter (Optional)
There is one Antenna input port on the rear of the Android head unit. You could simply take the one Toyota Antenna cable that fits in there and plug it right in and be done.
But the 4th Gen 4Runner uses two antennas, the second one being and in-glass FM diversity antenna.
Unfortunately the ISO Harness that comes with the head unit has an incompatible antenna connector that attempts to merge the two antennas and also power up the factory
antenna amplifier. You will not be able to use this connector.
But I still wanted to utilize both the factory antennas. To do so I purchased:
Metra 40-UV43 Male to Female Motorola Antenna Cable
SCOSCHE MDAB 1988-05 GM Micro/Delco Antenna Adapter
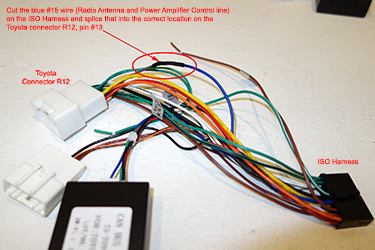
These parts merge the two Toyota factory vehicle antennas into one connector that fits the Android Head Unit and provides the best possible radio reception.
Also, I cut the blue #15 wire (Radio Antenna and Power Amplifier Control line) on the ISO Harness and spliced that into the correct location on the Toyota connector R12, pin #13.

Antenna adapters
|
Connected to the vehicle.
|
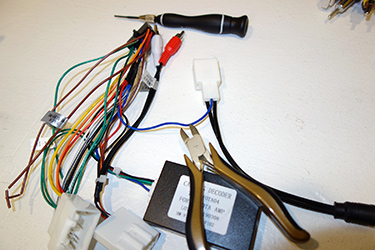
Cut off the incompatible antenna connector
from the ISO Harness
|
Connect the antenna amplifier wire
from the ISO Harness and splice into
the appropriate place on the Toyota Connector R12, pin #13
|
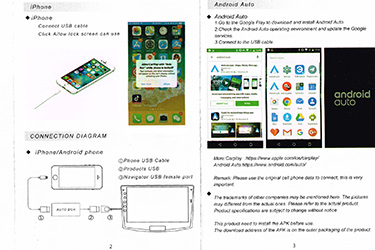
Apple CarPlay Dongle (Optional)
On the USB Cable #1 I have installed a CarPlay Dongle which will allow for both Apple CarPlay (for Iphone moblie phones)and Android Auto (for Android moblie phones).
There are a few different brand CarPlay Dongles available and they all look alike. I suggest the AutoKit brand dongle from CarTrimHome.com .
I have tried ZBox (which was available also from CarTrimHome) and cannot recommend that one. The ZBox unit was skipping when using SIRI and the Apple Music app.
Be sure to use the appropriate APK installation files for your particular CarPlay Dongle. The AutoKit APK is available here
AutoKit APK file .
The CarPlay kit looks and works just like a factory head unit with CarPlay pre-installed. The best feature of it is the phone and messaging apps. The phonebook/contact list
looks exactly like on your personal iPhone and it includes favorites and recent/missed call lists too. The messaging app is very useful, as SIRI will read your messages
to you and you reply by voice, with no typing necessary.
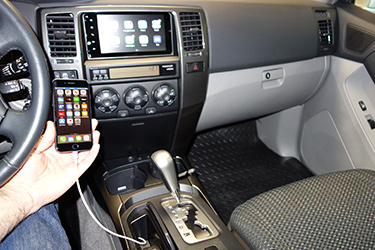
Installation is simple, just connect the Dongle to the USB Cable #1 on the rear of the head unit. Then connect an appropriate charging cable to the dongle.
I higly recommend using an OEM cable (ie. Apple Brand Cable for iPhones) for the best possible connection. I routed the charging cable behind the dash and under the console,
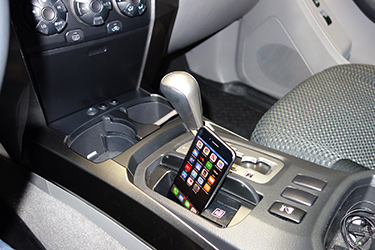
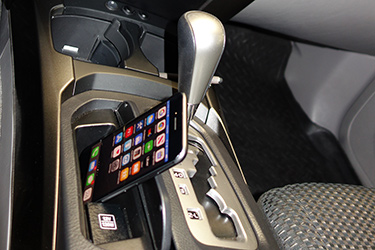
then thru a small hole drilled into the covered tray in the console. This is a convienent place to store the cable and iPhone during use rather than
using up a cupholder.
With the AutoKit version, I am able to boot up the Android head unit and have the Apple CarPlay load automatically. All I need to do is to connect my iPhone to the Lightning Cable.
No manually connecting to your personal hotspot is necessary as it would be if using the Android applications directly without CarPlay. This is becasue you are connected
via cable and not wirelessly. The dongle charges the phone at the same time as well.
AutoKit
CarPlay Dongle
|
AutoKit
CarPlay Dongle
|
Instructions Pg 1
|
Instructions Pg 2
|
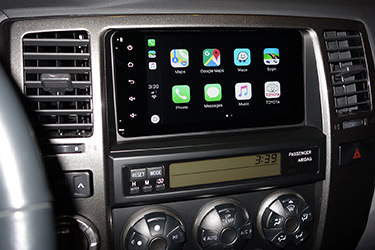
Home Screen
Apple CarPlay
|
The CarPlay Dongle is hidden behind head unit.
The charging cable comes up thru the storage bin.
|
All of the wiring is hidden under the center console
|
Convenient phone storage location
|
AutoKit
Menu System
|
AutoKit
Menu System
|
AutoKit
Choose your "Exit to System" icon
|
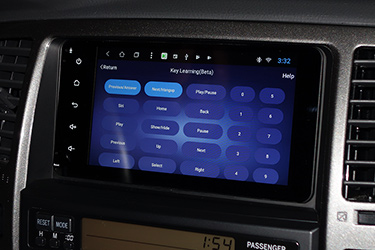
Key Pad Study
Specific to the CarPlay System
|
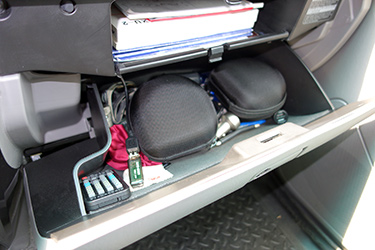
USB Flash Drive for Music Storage (Optional)
On the USB Cable #2 I have installed a 32GB Flash Drive primarily used for music storage.
Based on an average MP3 track of 3.5 minutes with a CD quality 256kb bit rate this will hold approximately 5,000 songs (400 albums, 300 total hours).
I have routed this USB Cable #2 into the back of the glove compartment for easy access.
USB Flash Drive
ran into the glove compartment
|

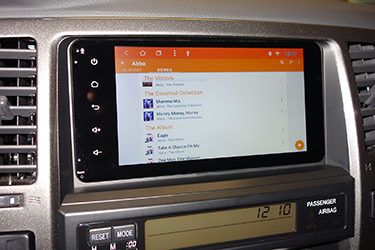
VLC Media Player
Sorted by Artist
|
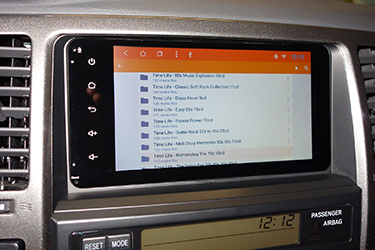
VLC Media Player
Sorted by Artist by Song
|
VLC Media Player
Directory Listing
|
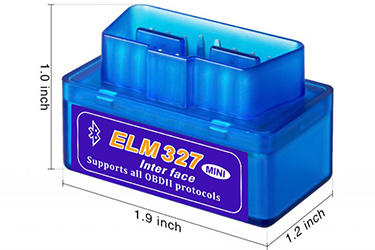
ELM327 OBD2 Bluetooth Module (Optional)
The ELM327 is a programmed microcontroller produced by ELM Electronics for translating the on-board diagnostics (OBD) interface found in most modern cars.
The ELM327 command protocol is one of the most popular PC-to-OBD interface standards and is also implemented by other vendors.
When using with a proper OBD2 App (such as Torque PRO), you may read and clear diagnostic trouble codes, reset check engine light, view freeze frame data,
view live sensor data, create your own dashboards, and know whether your vehicle is ready for a smog check.
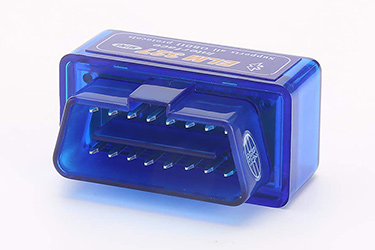
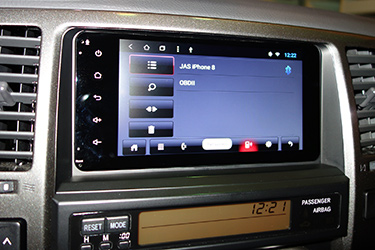
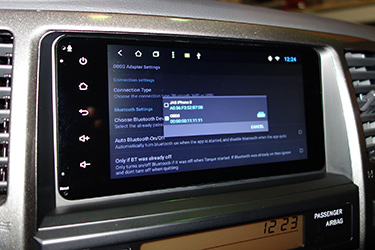
How To Setup ELM327 Bluetooth Scanner With Android:
Locate your the OBD2 diagnostic port under thge driver side dash and plug in the ELM327 OBD2 Bluetooth Module.
Turn on your ignition to ON (vehicle does not need to be on).
From your Android head unit go to the Bluetooth APP and scan for devices.
Pair the head unit with the OBD2 module.
Some modules may require password to connect. For ELM327 products, the default password is 0000 or 1234.
Open the Torque Pro app (requires purchasing from Google Play Store). Go to the Settings page and pair with the bluetooth scanner.
Once connected, go back to the Apps main menu and select desired features/functions.
OBD2 Bluetooth Module
|
OBD2 Bluetooth Module
|
Connect to the ELM327 module via Bluetooth
|
In Torque Pro choose the Bluetooth OBD2 device
|
Torque Pro
Engine Management and Diagnostic Tools
|
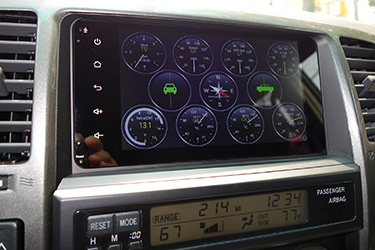
Torque Pro Dashboard
|
Video Output to Rear Screens (Optional)
Everything you display on the Android head unit screen can be shared with the RCA Outputs of which there are two.
I have the video output going over to my rear passengers screens.
I am using these RCA Cables for the output.
They are 6 foot long RG59 3male to 3male RCA cables with 24K gold-plated connectors. Looking back I don't think I needed the 3 wire type with audio output
and could have used one wire video output only. I simply routed these RCA cables behind the head unit and down to the center console.
Once under the center console, the wires are routed under the carpeting and under the passenger seat to where the audio/video controller is for the headrest screens.
The RCA cables plug into External AV Input on the audio/video controller. The rear seat passengers can then select 'AUX Input' as their source to get a closer look at what I am doing up front.
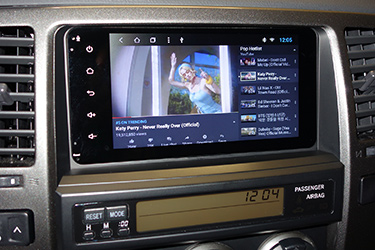
YouTube Music on Android Head Unit
|
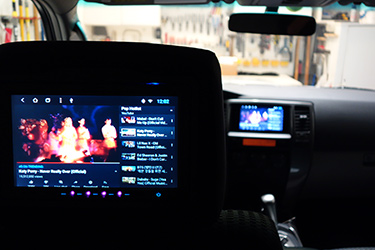
Video Output sent from Android Head Unit
to rear passenger headrest screens
|
Video Output sent from Android Head Unit
to rear passenger headrest screens
|
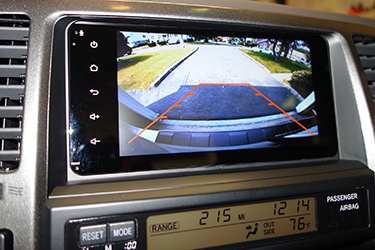
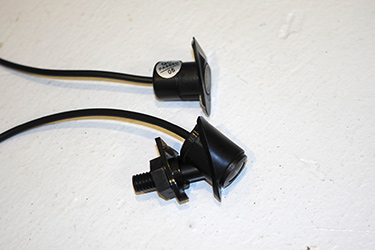
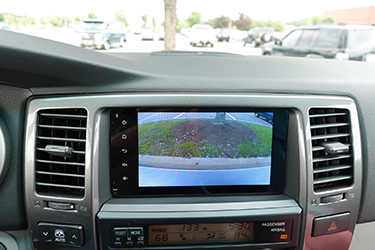
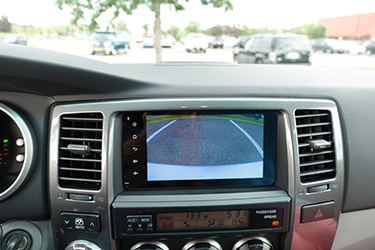
Backup Camera (Optional)
There is a backup camera available for purchase at CarTrimHome.com for those that do not have the factory installed camera. It has integrated night vision LEDs.
Though this camera is most likely higher definition than the factory Toyota version, I dont feel that it would be a big enough difference to warrant the
additional cost and trouble of installation. The factory camera is working fine with the Android unit though at night the video does look low quality.
You now have the added ability to display a reverse line ruler to assist with parking.
There is a trajectory lines option (guide lines that move with the steering wheel) as well but I could not get it to work.
Available backup camera
|
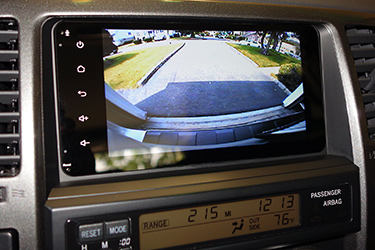
Factory backup camera in use
|
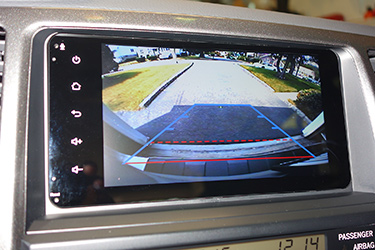
Factory backup camera in use
showing optional reverse line ruler
|
Factory backup camera in use
showing optional trajectory lines
|
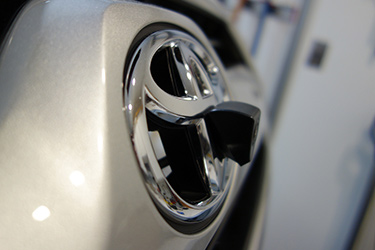
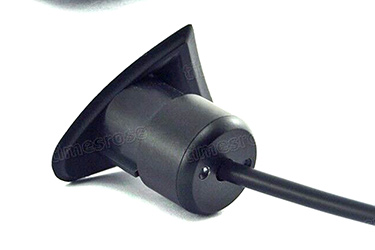
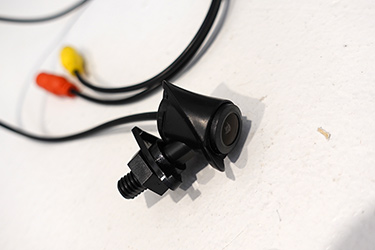
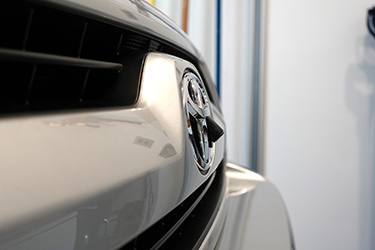
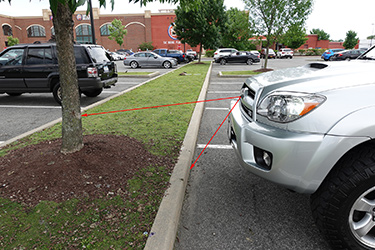
Front Facing Toyota Logo Camera - (Optional)
A nice feature of this head unit is the ability to add a front facing camera.
The benefit of a front facing camera is so that you can see the area directly in front of the vehicle. This is especially useful in a high ground clearance vehicle
like a lifted 4Runner that does not have a sloped hood and can be difficult to see that area. You can use it to avoid hitting parking blocks, curbs, and
other obstructions as well as for certain off-road situations.
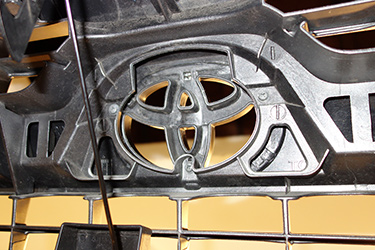
There really isn't a front facing camera specifically made for the 4Runner front Toyota emblem. I tried three different cameras before finding a suitable one.
Please jump down to Camera#3 for the one I recommend.
You can find a variety of these on Amazon or eBay.
Since these are for different model Toyota's some didn't quite fit in the emblem exactly how I would like and others had non-optimal viewing angles.
Front Facing Camera #1
I am not using this particular camera on my vehicle.
I did not even wire this one up. The camera sits on top of the emblem rather than fitting inside.
I believe this may be for the larger Tundra emblem. The angle of the camera looks pretty decent and it bolts securley to the emblem, but it just
does not look good at all.

Toyota Logo Front Camera
Non-Flush mount type
|
Toyota Logo Front Camera
Non-Flush mount type
|
Front Facing Camera #2
I am not using this particular camera on my vehicle.
The look of this camera is perfect. Flush mounted and factory looking. As you will see in the pics below, you will need to dremel out the emblem a bit
in order to fit the camera in. But when completed, you will not be able to tell that the drilling out was performed.
The problem with this camera is that the angle is no good for this implementation. I believe this camera is for a Highlander, and when installing in a 4Runner
it is pointed too far upward. You cannot see the edge of the bumper and do not see the area directly in front of the vehicle...the area that cannot be seen from the driver seat.
Toyota Logo Front Camera
Everything that is included in the kit.
|
Toyota Logo Front Camera
Flush mount type
|
Toyota Logo Front Camera
Flush mount type
|

Toyota Logo Front Camera
Will not fit without drilling
|

Toyota Front Emblem
Before Modification
|
Toyota Front Emblem
Before Modification
|

Toyota Front Emblem
After Modification
|
Toyota Front Emblem
After Modification
|

Toyota Logo
Front Camera
Flush Mount
|

Toyota Logo
Front Camera
Flush Mount
|

Toyota Logo
Front Camera
Flush Mount
|
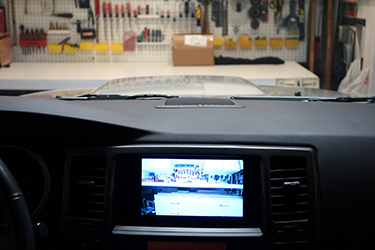 
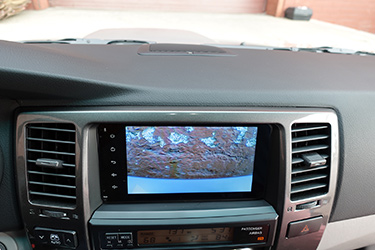
Here you can see the view of this Toyota logo front facing camera
Unfortunately, you cannot see the front bumper in the view
which makes it difficult to gauge exactly how close you are to an object.
Ideally the camera would be angled a bit more downward
|
 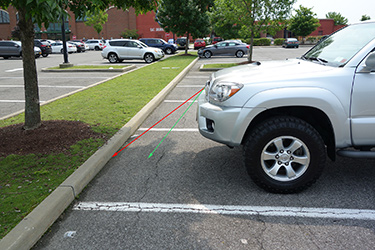
Here I am approaching a curb. With the curb at the bottom of the screen, you will find the vehicle is still quite away from it.
The red arrow indicates the viewing angle of this camera
The green arrow would be ideal so that you could see the bumper as a reference point
|
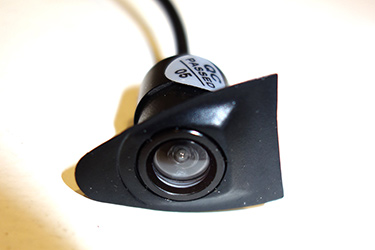
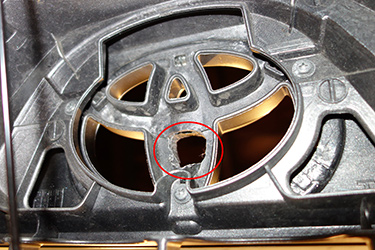
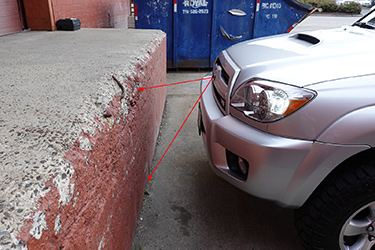
Front Facing Camera #3
This is the camera on my vehicle at the current time and the one I recommend.
Though it is not flush mounted and does portrude a bit from the emblem, it is moulded enough that it doesn't look too bad. It has a good downward angle that allows you to
orient yourself since you can see part of the front bumper. You cannot see the horizon though, and ideally it would have a taller view that showed a bit more vertical height.
Toyota Logo Front Camera
Everything that is included in the kit.
|
Camera #3
|
Comparison of Camera #2 (top) and #3 (bottom).
|

Camera #3 mounted
|

This camera required dremeling out the emblem even more than camera #2
|
Side view
|
The red arrow indicates the viewing area of this camera.
You can see on the screen the front bumper is included as a reference point
If you compare this picture to the same one taken above in the Camera #2 section,
you can see how much closer the vehicle is to the curb now with the curb at the very lower part of the screen.
|
This pic shows you how much you can see on one screen at one time
I have positioned the curb at the top of the screen.
Unlike camera #2, in the screen view you will find more of the usefull area directly in front of the vehicle and less of the further away distance and sky.
|
|
|
Front Facing Camera Installation
Here is a wiring diagram I put together showing how I wired up the front facing camera in my 2007 Toyota 4Runner.
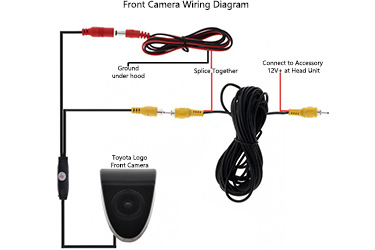
Front camera wiring diagram.
|
Start out by test fitting the front camera to the Toyota emblem. You will need to dremel out the emblem to get the camera to fit. Then go ahead and mount the camera
using the included washer and nut, snug it down for a secure fit.
The camera itself has a 2 foot cable coming out the back of it. The yellow RCA connector is the video output that needs to ultimately connect back to the head unit,
and the red connector contains the 12V+ Power and 12V- Ground inputs.
Next I go back to the head unit and connect one side of the 15 foot RCA cable to the #6 Yellow RCA connector marked "Video Input". This video cable also contains
a red wire running thru its entire length. This is so that you can connect it to Accessory 12V+ Power at the head unit, and only need to run one cable thru the firewall.
This will get you power to the camera without needing to cut any wires under the hood.
Splice the red wire coming out of the RCA cable to the Android head unit #1 Red ACC wire. This will then have power only when the head unit is on.
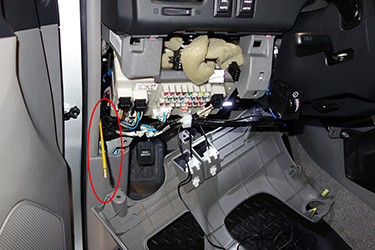
Run this single cable behind the dash and over to the driver side footwell.
In the engine compartment cut the nipple off the driver side firewall grommet as shown in the pic below. Then, from the interior side, use one rod of a
Fiberglass Wire Running Kit, with the RCA cable taped to it, to push the RCA cable thru the grommet.
Once you get the wire into the engine compartment run it under the hood liner towards the grill.
With the RCA cable near the grill, splice the red wire coming out the the RCA cable to the red wire coming from the camera. Connect the black wire coming from the camera
to a bolt under the hood. Lastly connect the RCA connector coming from the camera to the RCA connector you ran thru the firewall. Use electrical tape to cover the
exposed metal on the RCA connector and hold the two ends together securely.
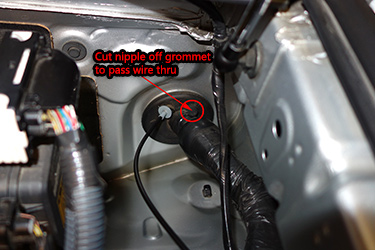
This is the driver side firewall grommet that you will pass the wiring thru.
|
Here I am using my Fiberglass Wire Running Kit to push the wire thru the grommet from the interior side.
|
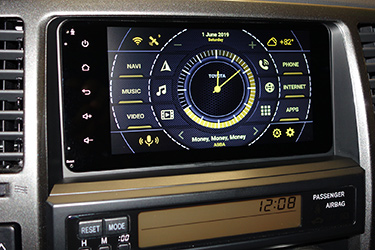
Car Launcher Home Screen (Optional)
This is the default Car Launcher (Home Screen) that the CarTrimHome Android head unit comes pre-installed with.
Home Screen
Default Launcher Screen
|
Never one to leave well enough alone, I decided to install an aftermarket Car Launcher called AGAMA Car Launcher AG available for a few bucks at the Google Play Store.
Never before was multimedia control in your car so handy. Meet the new AGAMA home screen. All important functions and information you need are now just a click away. A sleek design and ease of use go hand in hand with flexible adjustment options. AGAMA can be adapted to the interior of your car and your mood.
Home Screen
Optional - via Car Launcher Agama App
|
Car Launcher Agama
during navigation
|
The AGAMA Car Launcher is intended for use in dashboard units and audio systems working on the Android operating system.
The most important advantages of AGAMA Car Launcher:
- Concise and purposeful design adjustable to the style of the car
- Flexible design settings
- 24 customizable buttons for quick application launch
- Speedometer widget for the exact speed on GPS basis
- Music player widget (supports the most famous apps for playing music)
- Navigator widget with support for route guidance
- Compass widget for travel enthusiasts
- Information display (Wi-Fi, GPS, mobile internet, bluetooth, USB, battery)
- Local weather information with a memory of 5 days
- Automatic brightness of the screen
- Voice assistant
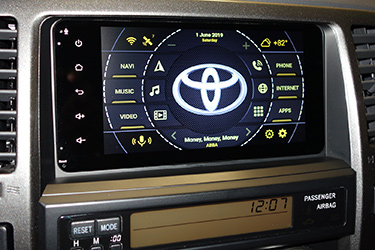
When stopped
shows Toyota Logo
|
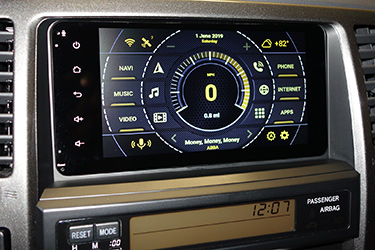
When moving
shows spedometer
and trip distance OR next turn if navigating
|
Clock mode
|
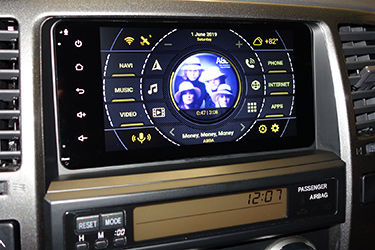
With music playing
shows album art
|
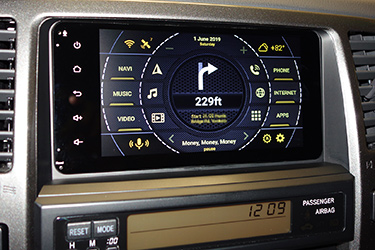
During navigation
shows directions
|
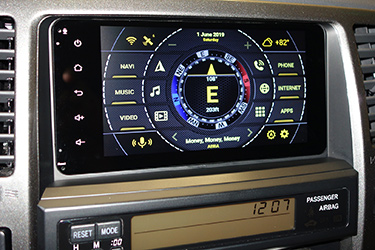
Compass mode
|
Review:
Below is a list of issues I experienced with this (pre-production) unit.
I have reported all these back to the manufacturer and they are considering whether it is worth it or not to continue with this project.
I am continuing to use this as I have invested significant time to get it to this point and really like the Apple Car Play functionality.
I much prefer to use the Apple CarPlay Waze app as my navigation software as opposed to the factory DVD based navigation.
As such I will continue to live with these issues.
Version 9.1 is available now but I have not been able to test this, so proceed at your own risk.
Issues:
Factory brackets require slotting for optimal fit.
Stereo Balance/Fader DOES NOT work.
The steering wheel button for 'Phone Disconnect' DOES NOT work.
Panel light color is Green rather than Orange. CAN NOT change the colors as the LEDs are not RGB type.
Factory backup reverse camera at night looks very low resolution.
No jack for an External Microphone though the internal microphone seems ok.
No built in accelerometer or gyroscope, therefore the pitch and roll gauges in Torque Pro do not work.
The ISO Harness is missing Aux input. I am sure I can wire this up myself but dont find a need for it with the USB Flash Drive and Apply CarPlay Music as a better alternative.
4GB RAM memory would have been preferred over the 2GB that this version includes. 32GB ROM not an issue since you can virtually use any size USB Flash Drive or even an SSD Drive for additional storage space.
Not recommended to try to update Android version from 8.1 Oreo to 9.0 Pie. Pie has been out 7 months at the time I received this head unit.
I have had my vehicle battery completely drain down a number of times.
A short while after installation the sound totally went out and stopped working.
Issues Resolved:
Battery Drain Issue. Typically I can store the vehicle in the garage for three weeks straight with no usage with no battery/starting issues.
Since installing this headunit, my battery has died a number of times.
Although I have changed the power off option from one hour delay to immediate, I still was experiencing issues.
To rectify, I cut the constant battery power wire (#5 yellow) on the headunit ISO harness and spliced the accessory power wire (#1 Red) into the side that goes into the headunit.
This cut all power to the head unit when the key is off. As such no memory will be retained, but any parasitic drain will also be eliminated.
This fix has eliminated the battery drain issue.
Sound Issue. I realized that I needed a remote turn on interface fot the JBL amplifier fix the issue where all sound stopped working.
I purchased an Axxess Interfaces Metra TYTO-01 Digital Amplifier Interface for Lexus/Toyota vehicles 2001-2015.
Installation Guide.
I removed the Car Trim Home supplied Toyota Canbus box and installed this in its place.
It required me cutting off the CTH supplied Totota R12 20 pin connector on the opposite end of the Android ISO wiring harness and hard wiring the TYTO-01 in its place.
This was able to get the sound working again.
Initally after installation of the TYTO-01, the balance and fader still did not work.
Additionally and more importantly to me, the navigation volume was way too low.
It was way too low whether I use the Andriod navigation apps (Waze, Google, etc.) or use the same apps via Apple CarPlay.
I read that before you remove the Toyota Factory Navigation with JBL system, you should increase the volume to 75% or more as the volume setting gets saved in the amp itself.
So I re-installed the Toyota Nav, increased the volume way up, shut it down, then re-installed the Android head unit.
This had no effect on the volume levels.
At that point I installed an Android Volume Booster app (Precise Volume) which helped a little bit but then made the radio way too loud.
Thinking outside the box, as I did with the battery drain issue, I cut the blue with white strip wire (amp turn on wire) going into the TYT0-01
and fed the TYTO-01 with accessory power wire (#1 Red). This would turn on the amp every time the vehicle is on so that the Navigation voice can be heard
even with the radio off. I believe this was necessary as the Navigation I use is via the USB based Apple CarPlay module and as such may not be
activating the remote amp turn on wire. This completely fixed my sound issues.
|
|